
Tracheostomy care is one of the basic skills a nurse should know. Learning how to do tracheostomy care is hard and complicated at first but with proper knowledge and practice, you can master this skill quickly.
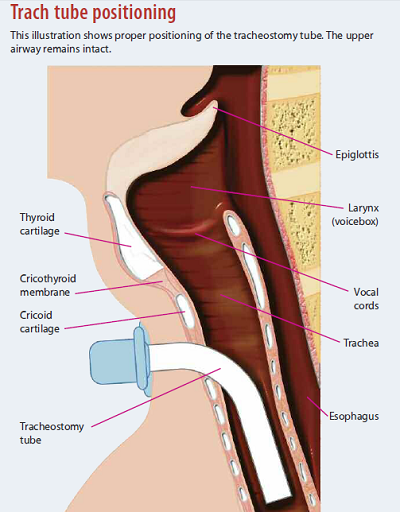
A tracheostomy is indicated for patients with severe respiratory problems where the breathing process is compromised. In this procedure, an incision is made in the anterior aspect of the windpipe or the trachea. Through this stoma, a tracheostomy tube will be inserted. The breathing process will be easier as the tube will bypass breathing through the nose and mouth.
Patients with tracheostomy tube need daily care for the stoma to prevent build-up of mucus that may cause irritation and infection. Nurses should be skilled enough when caring for trach patients as the latter are at high risk for complications such as infection, impaired ventilation, and airway obstruction among others.
This comprehensive guide presents standard and evidence-based practices that nurses should remember when performing tracheostomy care and suctioning.

Part I: Skin Care Around The Tracheostomy
Maintaining the integrity of the skin around the stoma is important in preventing the occurrence of infection. Here are some tips for proper skin care around the tracheostomy:
1. Regularly assess the stoma for signs of infection or skin breakdown due to flange pressure.
Using a gauze (or other nonfraying material) moistened with NSS, clean the stoma starting at the 12 o’clock position, wiping towards the 3 o’clock position. Begin again with a new gauze square at the same starting position and clean toward 9 o’clock. When cleaning the lower half, start at the 3 o’clock position and clean toward 6 o’clock. Wipe again from 9 o’clock to 6 o’clock, using a clean gauze for every wipe.
2. Because it may impair healing, use of hydrogen peroxide should be avoided unless the stoma is already infected.
If using it on an infected site, don’t forget to rinse it using NSS.
3. Keep the area around the stoma dry by using sterile and pre-packaged tracheostomy dressing under the tube flanges.
The dressing will absorb drool, sweat and mucous secretions around the stoma that may cause irritation and infection.
4. Apply a new dressing to the stoma site at least once per shift to absorb secretions and insulate the skin. You can also apply a skin barrier followed by a foam dressing or split-drain. Don’t forget to change a wet dressing immediately.
Part II: Changing The Trach Tube And Ties
Trach Ties
Trach ties keep a tracheostomy tube in place. It should be changed daily or as soon as it gets soiled.
Here are some tips in changing trach ties:
- Don’t change ties after eating. When changing trach ties, the movement of tracheostomy tube might stimulate the gag reflex and vomiting may occur. Wait for up to two hours after eating before changing ties.
- Attach the new ties before removing the old ties. This technique ensures that the tracheostomy tube will not be accidentally dislodged, especially when changing the ties for the first time after surgery.
- In changing Velcro ties or when the ties are extremely soiled, use the two-person technique. The two-person technique is the safest way of changing trach ties especially among pediatric patients. In this technique, one person holds the tracheostomy tube in place while the other one removes the old ties to attach the new one. This method is helpful in preventing accidental dislodgement of the tracheostomy tube.
Inner Tracheostomy Tube Cannula
The tracheostomy tube has an inner cannula that protects the whole tube from pooling of mucous secretions. It is removable so the lodged mucous secretions could be cleaned with brush and water.
There are two types of inner cannula – disposable and reusable. For reusable inner cannula, basic care techniques include the following:
- When mucous secretions are hard to remove, soak the inner cannula in half-strength hydrogen peroxide. The solution will loosen the hardened secretions so it will be easier to brush it off.
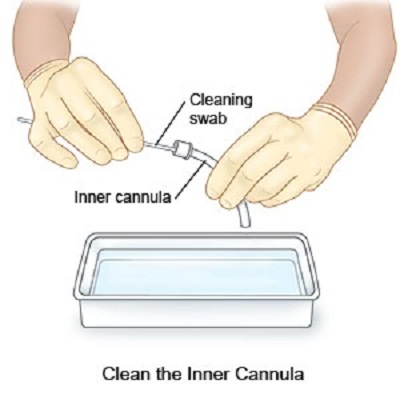
- Before attaching the inner cannula, make sure that it has been rinsed with NSS or sterile water after the hydrogen peroxide soak. After rinsing, dry the cannula with gauze. Hydrogen peroxide can be irritating, particularly to the mucous membrane. With that in mind, it will be best to rinse the inner cannula before reattaching it.
- For patients with a lot of mucous secretions, cleaning of inner cannula is advised every eight hours. Mucous secretions are good breeding ground for bacterial growth. To minimize risk of infection, cleaning of inner cannula every eight hours is advised for patients with excessive mucous secretions.
Outer Tracheostomy Tube Cannula
Changing the outer tracheostomy tube cannula is ideally done weekly or monthly. Tracheostomy tubes without inner cannula need more frequent changing.
Here are some tips in changing it.
- Use the two-person technique in changing the outer cannula. Changing of the outer cannula should be quick to prevent oxygen desaturation. In this technique, the first person will remove the old outer cannula while the second person will quickly replace it with the new outer cannula. Through this way, sterility will also be maintained.
- Have a spare smaller outer cannula at bedside. This is useful just in case the new cannula can’t be inserted into the stoma properly. Never force the new cannula if it doesn’t fit the stoma; just use a smaller one.
- Lubricate the outer cannula with a water-soluble lubricant. This technique is helpful in facilitating smooth entry of the outer cannula.
- Ask the patient to take a deep breath before removing the old outer cannula. This will minimize discomfort and it will also support quick removal of the cannula without encountering resistance.
- When inserting the new outer cannula, follow the curve of the patient’s throat. The patient should lie on his back comfortably so you can properly assess the throat’s curvature. Never force re-entry of the outer cannula especially if there is a resistance felt.
- Once the outer cannula is in place, hold it firmly while removing the obturator inside. When removing the obturator out from the new outer cannula, there is a great chance that the whole cannula will get dislodged. Make sure to hold the outer cannula firmly while removing the obturator.
To help you be more familiar with the parts of a trach tube, here’s a video you can watch:
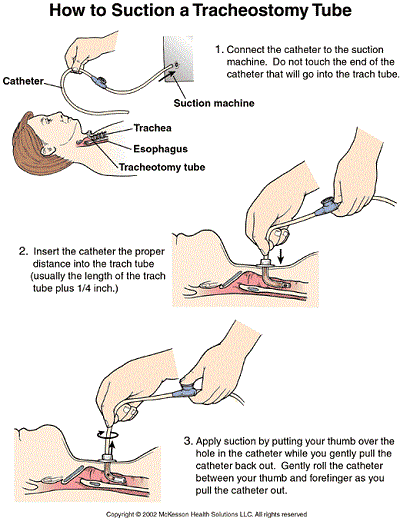
Part III: Tracheostomy Tube Suctioning
When You Should Do Tracheostomy Tube Suctioning?
Suctioning the tracheostomy tube is done whenever needed like when the patient’s oxygenation level is desaturating, when breath sounds are abnormal upon auscultation, and when there are episodes of dyspnea.
IMPORTANT: The timing of suctioning should be tailored to each patient rather than performed on a set schedule. Assess the patient first and determine signs that suggest a need for suctioning such as changes in respiratory rate, wheezing, unsuccessful attempts to clear secretions, decreased oxygen saturation, copious secretions, and increased work of breathing.
Suctioning is usually done during the following instances:
- When waking up – The respiratory tract normally accumulates mucous discharges while sleeping. Suctioning should be routinely done upon waking up to remove these mucous discharges.
- Before feeding – Suctioning the tracheostomy tube before feeding will ensure adequate oxygen supply to the body while feeding. It is important to remove the mucous discharges lodged into the respiratory tract before starting to feed.
- After feeding – When suctioning the patient after feeding, you should wait an hour after the last feeding. This is important in reducing the chances of vomiting.
- After nebulization/aerosol treatment –Nebulizations or aerosol treatments loosen sticky phlegm in the respiratory tract. Suctioning after a nebulization or an aerosol treatment is recommended especially if chest physiotherapy has been done after the treatment.
- When phlegm or mucous secretions have been coughed out from the stoma – whenever you see phlegm or mucous secretions coming out of the tracheostomy tube, suctioning is necessary. Phlegm is the most common cause of airway obstruction for patients with tracheostomy tube.
Part IV: Tips in Tracheostomy Tube Suctioning
The upper airway moistens, warms and cleans the air breathed as it enters the respiratory tract. However, when there is a tracheostomy tube inserted, the upper airway is bypassed making the air breathed cool and dry.
To compensate for these changes, the body makes more mucous secretions. These mucous secretions act as a protective barrier for the respiratory tract but they can also limit the entry of air to the lungs. For this reason, tracheostomy tube suctioning is an essential part of an effective tracheostomy care plan.
- To prevent infection transmission, nurses are required to practice good handwashing techniques, wear gloves and a mask when dealing with body fluids or patients with communicable respiratory diseases. Always wash your hands before and after suctioning the patient.
- Regardless of the tube used, suctioning always involves specific components. These include patient assessment, oxygenation management, use of correct suction pressure, liquefying secretions, appropriate patient positioning, use of proper-size suction catheter and insertion distance, and evaluation.
- Always suction the trach first. If you need to suction the nose and mouth of the patient, do it after suctioning the tracheostomy tube. Use the trach-nose-mouth order when suctioning the patient to minimize the risk of infection. The oral cavity of the patient is full of bacteria and should be suctioned last. Never use a suction catheter in suctioning the trach if you already used it to suction the nose and the mouth of the patient.
- Hyperoxygenate the patient before suctioning. The body will be deprived of oxygen for several seconds during tracheostomy suctioning so it is important to hyperoxygenate the patient first. Ask the patient to take 2 to 3 deep breaths, then administer 4 to 6 compressions using a manual ventilator bag. With a ventilator patient, activate the hyperoxygenation button.
- Limit duration of trach suctioning to 10-15 seconds. You should also limit suctioning for up to two passes for each round. Limit suction pressure to 120 mm Hg for open-system suctioning and up to 160 mm Hg for closed-system suctioning. These conditions are important in maximizing the patient’s oxygenation level.
- A trach tube can either be fenestrated (allowing speech) or unfenestrated. Before suctioning, one must insert a plain inner tube within a fenestrated tube as the latter has a small opening that may be punctured by the suction catheter.
- When using open-system suctioning, the size of the suction catheter should not exceed half of the inner diameter of the tracheostomy tube. The common technique in determining appropriate catheter size is to divide the size of the internal trach tube by two and multiply it by three. For closed-system suctioning, the standard suction catheter used is French 12.
- All staff members (including the unit secretary) should know which patients have trach tubes and always be prepared for trach emergencies. Essential emergency equipment that must be readily available at the bedside of trach patients include suctioning device and catheters, an obturator of the right size, manual ventilator bag, and two extra trach tubes—one of the patient’s current size and a smaller one.
Part V: Additional Tips & Warnings
Are you ready to do your first tracheostomy care? Here are more tips that you should remember:
- When doing tracheostomy care for patients at long-term care facilities, cleaning involves using plain soap and water. Use of diluted hydrogen peroxide everyday can cause irritation and impaired skin integrity.
- Never use oil-based lubricants around the trach stoma. Oil-based lubricant and ointments like baby oil, Vaseline, and petroleum jelly are not recommended as they can cause impaired skin integrity in the long run.
- Avoid using normal saline solution (NSS) to loosen tenacious secretions. Instead, you can hydrate the patient or use humidified O2. NSS is against evidence-based practice because it: (1) may reach only limited areas; (2) may flush particles into the lower respiratory tract; (3) may lead to decreased post-suctioning oxygen saturation; (4) increases bacterial colonization; (5) damages bronchial surfactant.
- Velcro ties can be reused. You can wash it with soap and water so it can be reused in the next tie change.
- For pediatric patients, use of Velcro ties is not recommended. Velcro ties can be removed accidentally so plain cotton ties are commonly used for pediatric patients.
- If it’s your first time to do a tracheostomy care, have an experienced companion nearby who will assist you. Doing tracheostomy care is a critical task so it often involves a two-person technique. Get an experienced companion in doing tracheostomy care so you can be guided properly.
- Emergency reinsertion of the tracheostomy tube is done when the tube accidentally become displaced while suctioning or when trach care is being performed. To keep the patient’s airway open, the health care provider should replace the trach tube with a new sterile one or just reinsert the original trach tube. You can also occlude the stoma and use an ambu bag and mask to ventilate the patient at a rate of 8-16 breaths per minute until the EMS arrives.
Additional Readings:
Tracheostomy in Children: Care and Management Review – Great Ormond Street Hospital for Children
Cleaning and Caring for Tracheostomy Equipment – Johns Hopkins Medicine
Tracheal Suction Guidelines – Cleveland Clinic
About the Author: Je Abarra is a nurse by profession and a freelance writer by passion. She is working as a staff nurse in the pediatric ward of a private city hospital for more than two years. During her free time, she usually writes about her fascinations in health and nursing. She loves to provide tips and fun facts about nursing and healthy living.


