
If there’s one thing that scares a lot of students and newly registered nurses, it’s probably starting an IV line.
There’s always the fear of hurting the patients or blowing up a vein. The idea of poking a patient several times can make any nurse feel really anxious, too.
Despite how unnerving it is, all nurses need to know how to start an IV line safely and correctly. Otherwise, they won’t be able to help their patients recover.
Also Read: How NOT To Blow A Vein – 20 Useful Tips for Nurses
To help you overcome your fear and master this really critical nursing skill, here are a few tips and tricks you might find handy. Take note that these tips aren’t applicable to all area so be sure to review your hospital’s policy as that can help with compliance.
For standard practices in infusion therapy, you can visit the Infusion Nurses Society.
Step 1: Choose the right catheter/cannula size
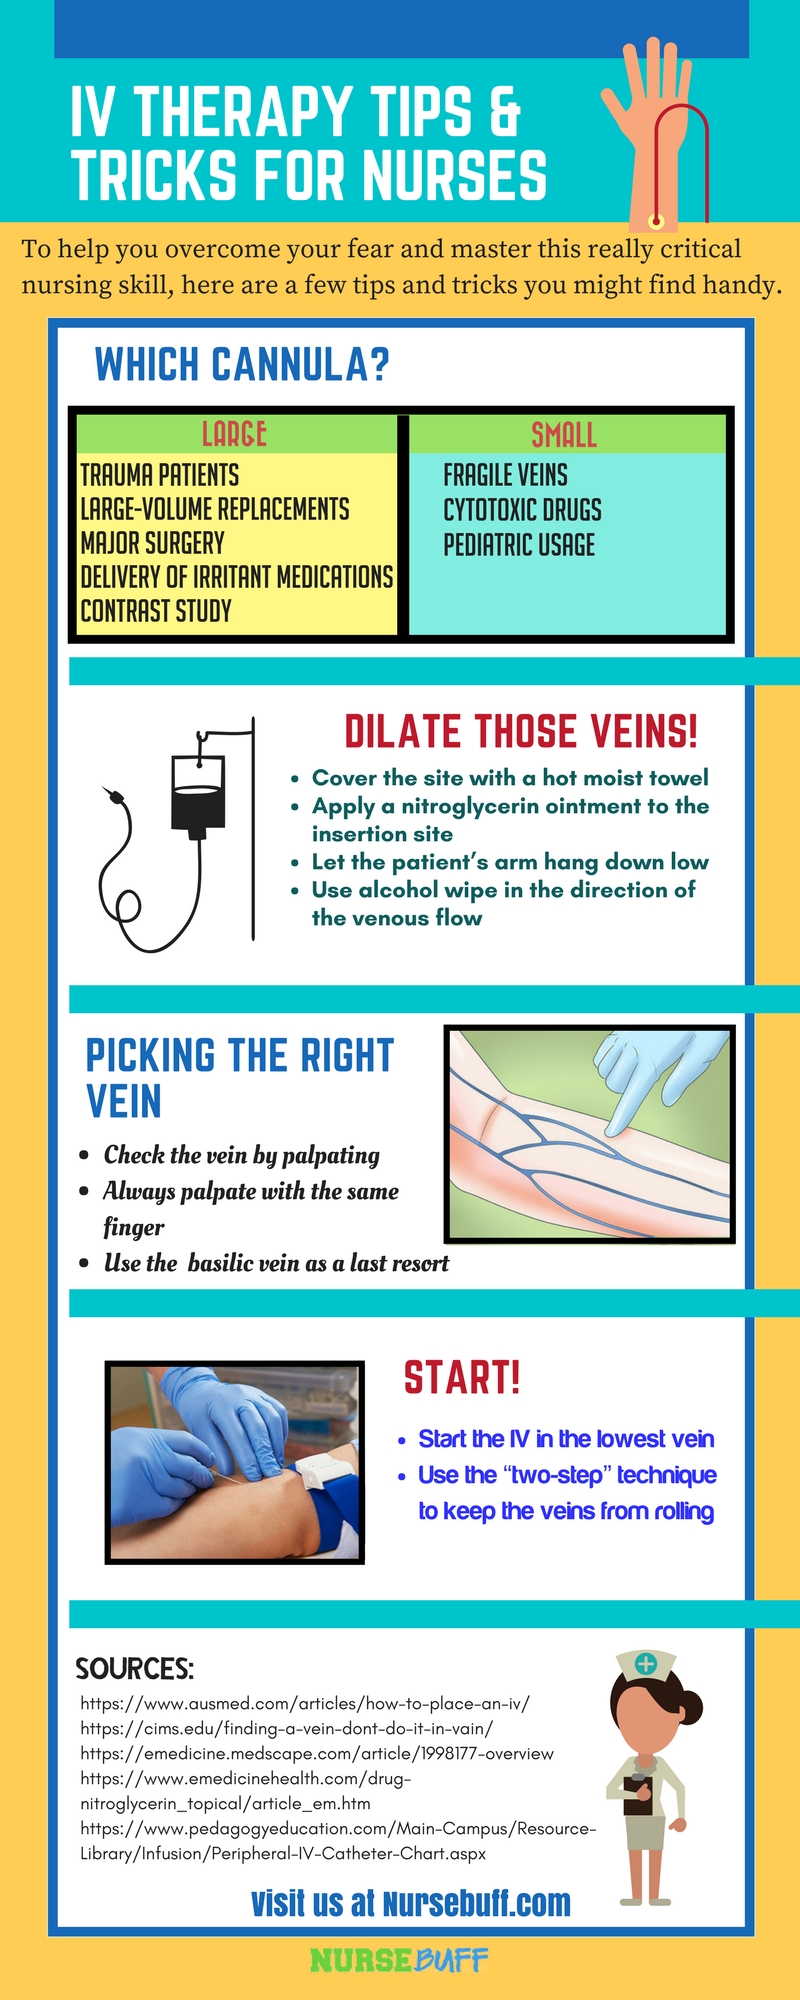
- Ideally, you should use a large bore needle for patients who are likely to become surgical patients and those who might need a blood transfusion or emergency medication later on. This will make it easier to provide emergency fluid replacement or bolus life-saving medications if needed.
- Choose the size of the catheter based on the type of care the patient needs. For example, you can use 22g in a bag of blood that needs to run over a period of less than 4 hours. A bigger catheter size, on the other hand, is ideal if you’re going to pressure a bag in.
- Use smaller gauge catheters if you’re going to deal with patients in non-emergent settings or if your patient has a more stable condition.

- Patients who will undergo computed tomography (CT scan) with intravenous contrast need a larger cannula size (20g or 18g) as the procedure involves the injection of about 75 ml of contrast at a rate of 10-20 ml/s with pressures of up to 300 p.s.i.
- As much as possible, use a smaller cannulae in patients with “vasculopathy” (i.e. any disorder of the blood vessels). This is to preserve the available veins. This includes patients with diabetes and history of drug abuse. You also need to do the same thing for chronic steroid users and those with fragile veins or history of chemotherapy.
- Before using the veins, determine first if long-term treatment is foreseen. This way, you’ll be able to reserve the available veins ONLY for emergency access.
- To minimize pain and tissue damage, stick to using a smaller catheter in a large-bore vein when administering hypertonic or irritating drugs. Examples include Phenytoin, Potassium or 50% Dextrose.
- If possible, use “needle-less” equipment and/or retractable sheathing cannulae sets such as Critikon™ (Protectiv-Plus)™ in unstable, agitated, and convulsing patients.
Step 2: Prepare the patient
- Educate the patient about the procedure to prevent anxiety. Make sure that he/she is well-rested, comfortable, and warm enough to avoid vasoconstriction. Try to establish a rapport with your patient to make them feel more relaxed. This can help make the veins easier to access.
- Try to feel and look confident, even if you are not. Avoid making the impression that you don’t know what you are doing. Communicate with the patient, act like a professional, and don’t let your hands shake.
- Cover the site with a hot moist towel or a warm blanket. Sufficient warmth will help bring the veins to the surface and dilate them.
- You can also apply a nitroglycerin ointment to the insertion site to dilate very small veins. Leave it on for about one to two minutes before disinfecting the site with alcohol. Nitroglycerin, if used briefly, can provide good vasodilation without causing bad systemic effects.
- Promote venous filling through gravity by letting the patient hang his/her arm down as low as possible. Just make sure that the gurney is raised sufficiently so you can perform IV cannulation without hurting your back. If it’s a distal site you’re dealing with, kneel or seat so you can insert the IV line steadily. When inserting the IV in lower extremities, ask the patient to dangle the limb over the side of the bed to encourage venous filling.
- Patients who are hypovolemic or in a state of shock must be placed in Trendelenburg’s Position. This is to minimize air embolism, permit access, and promote venous flow towards the neck.
- Next, start the IV on the non-dominant side for the patient’s convenience. If you can’t get one started, you can consider the veins on the dominant side.
- Stable patients usually need only one peripheral access, especially if it’s secure and carefully chosen. However, if your patient is suffering from severe bleeding or major trauma, expect the need to start at least 3 lines.
- When the patient’s limb is in motion while inside an ambulance or aircraft, you can secure the site by locking the arm in extension and blocking the flexion at the elbow. You can also control the movement by placing the distal part of the limb under one’s own axilla or humerus.
- Try to avoid shaving a venipuncture site. This may only result in nicks or cuts. As long as the skin and hair around the IV insertion site are vigorously scrubbed and left dry, the adhesive will stick properly.
- Using an alcohol wipe, disinfect the insertion site in the direction of the venous flow to improve filling of the veins. Clean the area widely and vigorously to prepare possible veins nearby.
- Even while you’re still “shopping” for the right vein to stick, you can already use the alcohol swab. By rubbing the area vigorously and widely with the alcohol swab, the veins will become much more visible.
- After disinfecting the venipuncture site, let the alcohol dry for a while. IV insertion becomes much more painful when you do it using a needle coated with alcohol.
- Patients with generalized edema can be given an ACE wrap to their forearm. Elevate the affected part and wait for about 15 minutes or until the swelling decreases temporarily. During IV insertion, leave a bit of the cannula out and anchor it well so that the tissue can have enough room to expand once the edema reoccurs.
Step 3: Find the right vein
- Look for the right veins by ‘feeling’ rather than ‘visualizing’ them. Remember that although a vein may look good on the outside, it might be too frail for an IV insertion to take place. You can practice by checking out the veins of your friends and family members.
- Always use the same fingers when palpating a vein to familiarize them with the feeling. Engorged veins usually have a bouncy feel to it while other things, like tendons, don’t bounce.
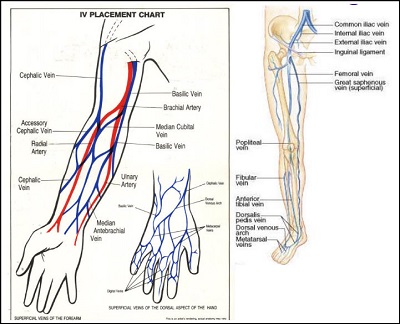
- Veins that are ‘deeper’ or those that you can’t see usually provide better insertion sites than superficial veins which are mostly thin. However, try to avoid thick veins just below a bifurcation (i.e. a point where the thick vein branches out into smaller veins) as they are more likely to blow within an hour.
- When you’ve already looked everywhere and still can’t find the right vein for IV insertion, you can try the basilic vein as a last resort. It can accommodate 18g needle for blood transfusion. Just make sure that the patient doesn’t have contractures, paralysis or arthritic joint.
- When you’re dealing with older patients or those with fragile veins that blow easily, you can visualize the veins by using a blood pressure cuff instead of a tourniquet. After ensuring the absence of any leaks, inflate the cuffs a few points higher than the patient’s diastolic.
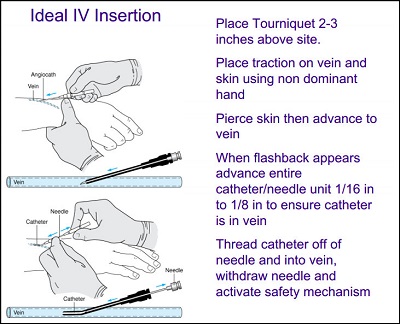
Step 4: Insert the IV needle
- All patients must be considered infective at all times. Wear gloves to protect yourself.
- Tap (or even slap) the vein to make it more visible. This is a good trick to use if you’re dealing with people of color.
- To minimize the pain, prepare an insulin syringe containing 10 units of bacteriostatic saline and then inject it intradermally. You will need a physician’s order before doing this, especially if it isn’t in your hospital policy and procedure. Compared to lidocaine, the benzyl alcohol works as a local anesthetic without causing a burning sensation. However, only administer it if everything is ready as the numbing effect only lasts for about 45 seconds.
- Ideally, you should start the IV in the lowest veins and work upward. If you start at the most proximal point, you can potentially lose several sites you could have had below it.
- The moment you spot the right vein, start asking the patient random questions like “What do you do for a living?” or “How many kids do you have?” as a distraction. Insert the IV as the patient answers your questions.
- During IV insertion, the patient will feel pain the moment the skin is punctured and when the needle pops into the vein. Discomfort can also happen when the “rolling” veins cause the needle to probe into non-vascular structures, such as muscle or tendon. You can minimize this error by using a “two-step” technique (separate punctures of skin and vein) instead of a single thrust.
- When you’ve already inserted the needle and you’re sure of it but still not getting any blood return, you are probably in a sclerotic vein.
- Remember that the needle is a bit longer than the cannula so once the former enters the vein, insert it a little bit more. You should do this before retracting the needle to ensure the cannula is in the vein.
- When you fail to insert the IV cannula on the first try, explain to the patient why it didn’t work in a friendly manner. Most patients with “bad” veins have been through this situation before and already know what to expect. To comfort the patient, you can say “These things sometimes happen. It’s not your fault. It’s not my fault. It can just be the way it is this time.”
Share This Infographic
Pin and add this helpful infographic to your social media.
Share this Image On Your Site
Recommended Articles:
Hungry for more IV therapy tips and tricks? Here are additional resources you might want to read:
How to Perform IV Insertion On Very Fragile Veins: 5 Essential Tips for Nurses – It’s an essential guide for nurses who are having difficulty initiating IV therapy in patients with very fragile veins. It will show you the different factors that cause a patient’s vein to become fragile.
Tips for inserting an I.V. device in an older adult – It features specific tips that can help nurses in performing IV insertion in older patients quickly and efficiently.
How To Perform IV Insertion On Obese or Edematous Patients – This article presents scientifically proven techniques to initiate IV therapy in patients who have high-fat deposits or severely edematous.
How To Perform IV Insertion On Pediatric Patients – This article contains a list of tips and strategies to perform IV insertion in pediatric patients without giving false expectations and causing traumatic experiences.


